Creating a portfolio
Author: Gaute Greiff Flægstad
Last updated: September 21. 2024
This guide will teach you how to deploy your own "home made" portfolio to an online web page. For hosting this page we will use Githubs "Github Pages", which is a service provided by Github to host your own web page on their servers. This comes with some limitations, but for the purpose of this course, and to deploy a portfolio, it works just fine. As you may or may not know we use Gitlab for development in Propulse, so why would we use Github now? Actually no particular reason. If you prefer Gitlab, there is an identical feature called Gitlab Pages that you can use. BUT I recommend not using you Propulse account, as you may want to use this portfolio after your time in Propulse :). I have a personal account on Github so thats why I chose it, and also it's not a bad thing to have experience with both websites.
In terms of development, this project is purely frontend. Github/Gitlab Pages only support hosting of static web pages. That means no server-side processing is allowed (ex: no database :c). We will use React with Next.js for frontend, which is a widely used and modern componet based framework. The concept is to build resuable chunks of code to make development of more complex sites easier. We will also use a component library called Material UI to import prebuilt components. These kinds of libraries can save a lot of time, and are very easy to customize to your liking, as will be showed later. As for the programming language, Typescript is my preferred option. It is basically Javascript, but with type declaration to save yourself some confusing errors while developing. For styling, either css, scss, or tailwind can be used, but when using a component library I find that I rarely (or never) have a need for it.
So why are we doing this? The main purpose of this course is for the members of DevOps to get hands on experience with web development, to practise use of frontend tools and to get used to Git-commands and repositories. This experience will come in handy during development of this years projects, and probably in the future as well.
Another benefit is that you are going to build an actual portfolio that comes in handy when applying for jobs. Of course there are websites nowadays that can do this for you, but it`s a much bigger flex to have built it yourself!
Here is my work in progress portfolio for reference: gautegf.github.io
The content of this course is as follows:
- Create a repository
- Add an SSH key
- Clone the repository
- Install some needed tools
- Create the react project
- Begin Developing
- Add auto syncing
A repository is an online version tracker of your application. We develop on a local version on our pc, and use git to keep the repository updated with new changes. It is essential when working together with others, as it allows each developer on a project to keep track of new changes. Start by creating the repository like this:
Step 1
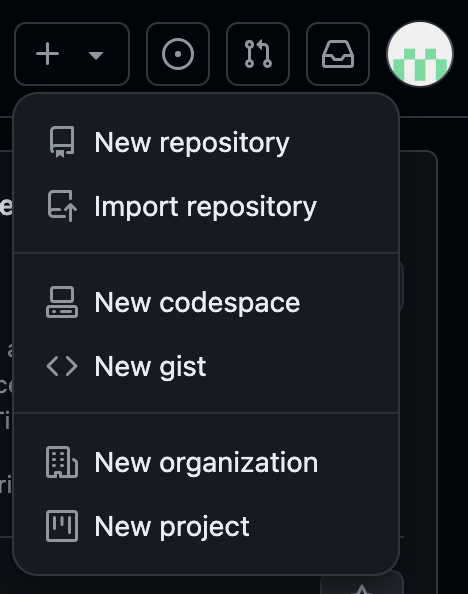
Log into Github and press the "+" icon. Select "New Repository"
Step 2
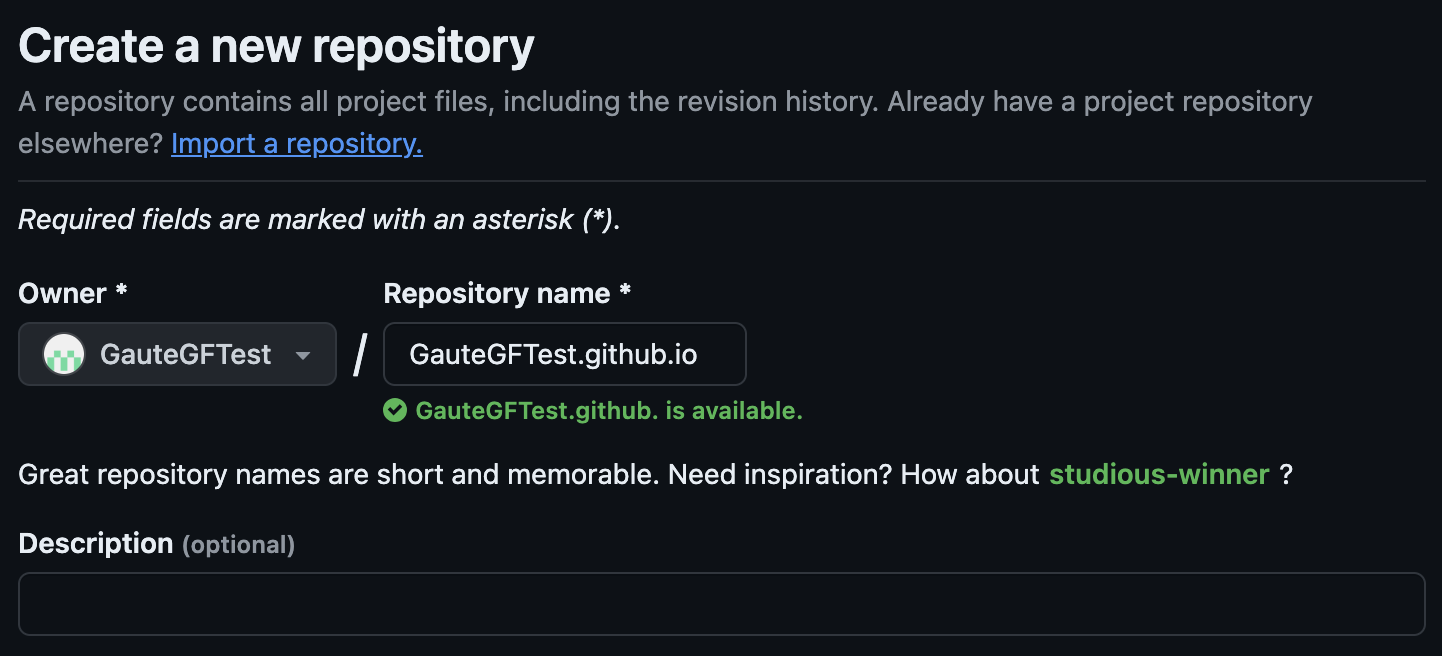
Name your repository "username".github.io.
NOTE: The repository name MUST contain lower case letters only, dont repeat my mistake!
The rest of the settings can be left unchanged. Now press "Create Repository".
If you already have an SSH key, skip to the next segment
Now, we want to store a local verison of the repository on our pc. This is done by cloning it to the pc`s storage. To clone a repository we use something called an SSH-key, which is an authentication tool for secure communication between our pc and remote servers. This is necessary to create a connection between the remote tory and our local one. The key is unique to your computer, and must be added to your Github profile. To check if you already have one click on your Profile icon → Settings → SSH and GPG keys.
If you don`t, check if you have one genereated on your computer and possibly generate a new one
Mac/Linux
- Open a terminal
Check for SSH Key Files:
By default, SSH keys are stored in the ~/.ssh directory. You can list the files in this directory with the following command:
Look for a file named
id_rsa.pubor something similar. See how to connect it to your account under this segment.
If you receive an error that ~/.ssh doesn't exist, you do not have an existing SSH key pair in the default location. You can create a new SSH key pair in the next step.Generate SSH key:
Use the ssh-keygen command to generate a new SSH key pair, replace the email used in the example with your GitHub email address.
When prompted to enter a file to save the key, press Enter for default location.
When prompted to enter passphrase, either set a memorable password or press Enter to leave it empty. Setting a password is of course more secure, but isn`t strictly necessary. If you choose to do so, I recommend adding your key to an SSH agent to avoid having to enter a password every time the key is used. Check out SSH agents in Githubs documentation.
To print out the key run this command:Assuming that your key is named
id_rsa.pub. Note: Whatever your key is named, make sure it has.pubas it is the public key we want to give to your Github profile.
Now select the entire key and copy it.
Windows
- Open PowerShell or Command Prompt
Check for SSH Key Files:
SSH keys are typically stored in the C:\Users\<YourUsername>\.ssh directory. You can list the files in this directory with the following command:
Look for a file named
id_rsa.pubor something similar. See how to connect it to your account under this segment.
If you receive an error that [...]/.ssh doesn't exist, you do not have an existing SSH key pair in the default location. You can create a new SSH key pair in the next step.Generate SSH key:
Use the ssh-keygen command to generate a new SSH key pair, replace the email used in the example with your GitHub email address.
When prompted to enter a file to save the key, press Enter for default location.
When prompted to enter passphrase, either set a memorable password or press Enter to leave it empty. Setting a password is of course more secure, but isn`t strictly necessary. If you do choose to, I recommend adding your key to an SSH agent to avoid having to enter a password every time the key is used. Check out SSH agents in Githubs documentation.
To print out the key run this command:Assuming that your key is named
id_rsa.pub. Note: Whatever your key is named, make sure it has.pubas it is the public key we want to give to your Github profile.
Now select the entire key and copy it.
Add your key to Github account
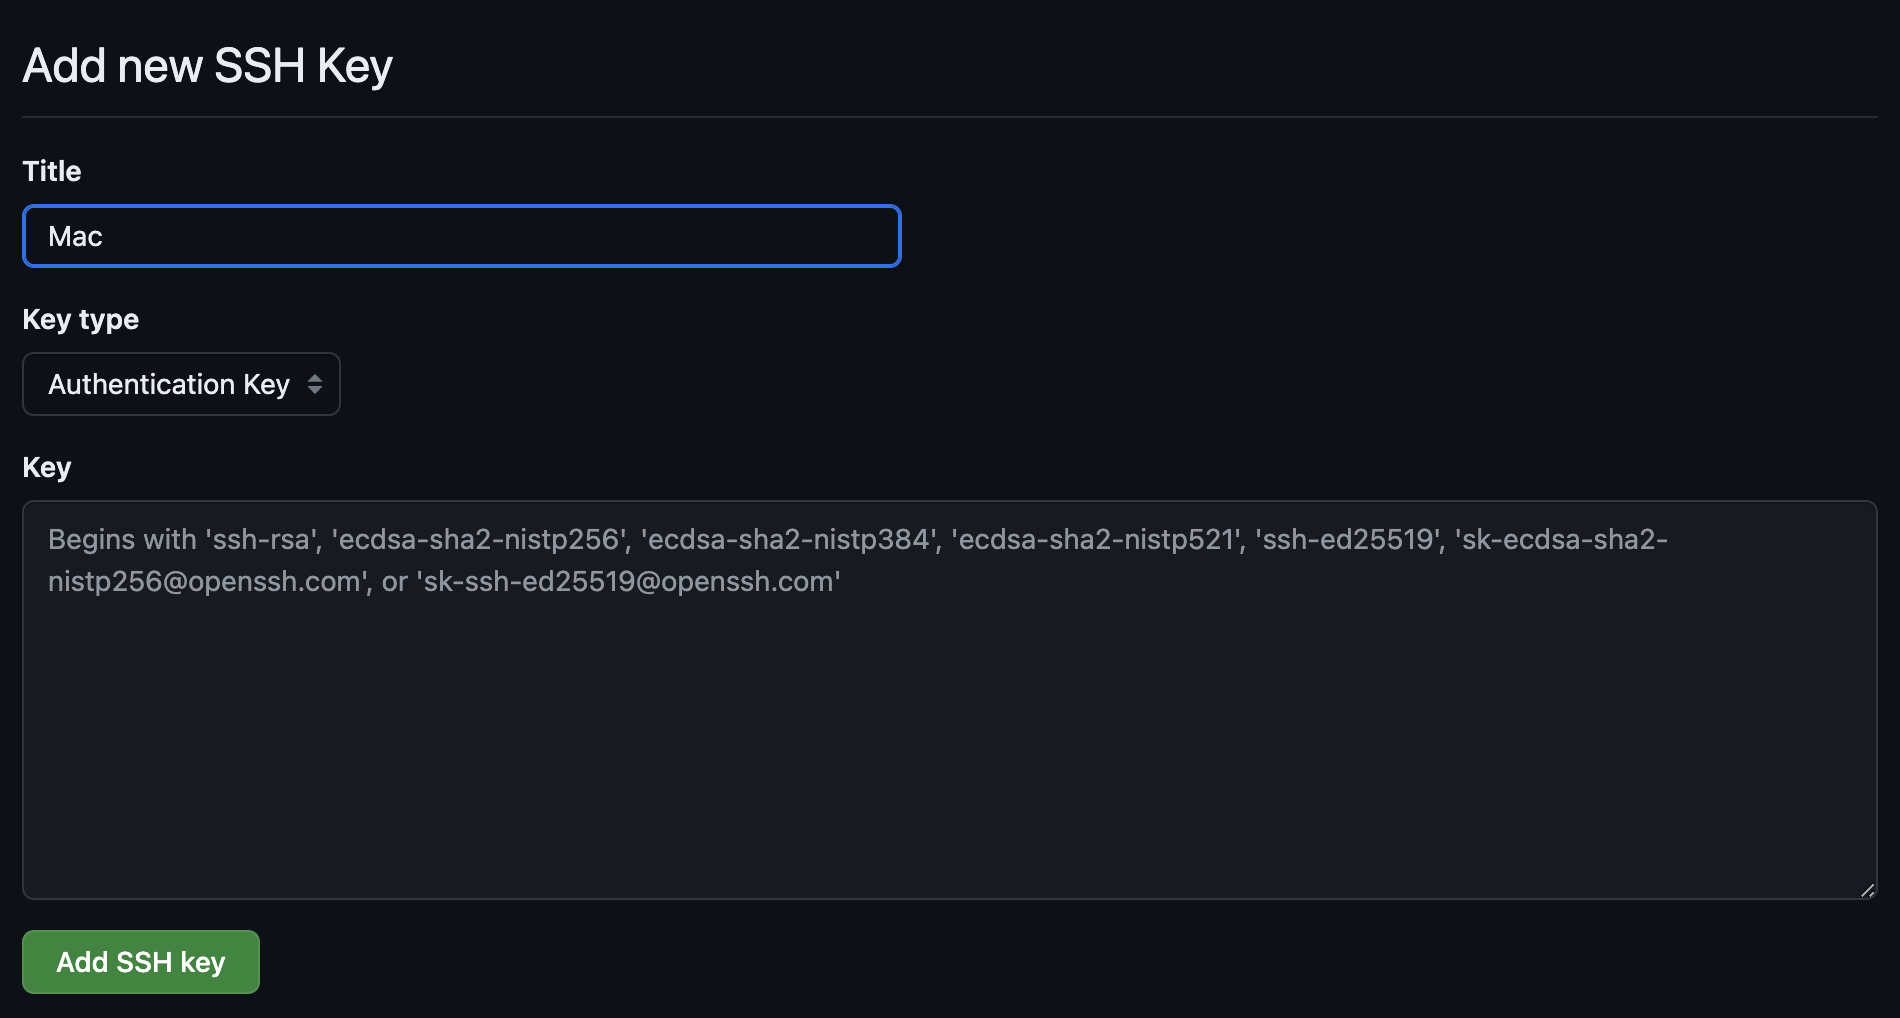
Once you have copied your public SSH key, it must be added to your Github account.
Navigate to "SSH and GPG keys", and press New SSH key .

Name the key something that relates it to your computer, paste in the key, and press New SSH key .
Time to clone!
Step 1
Navigate to the frontpage of your repository, under "Quick setup" press the SSH button, and copy the link.

Step 2
Open a terminal and navigate into the folder where you want your project to be located.
Then paste in this command, replace the link with the one from your repository.
You can ignore the warning about cloning an empty respository.
Finally it`s time!
Well... almost. We need to make sure that some important stuff is installed. More precisely, we want Node, NPM and NVM.
NVM (Node Version Manager)
As the name suggests this is a tool to manage which version of Node is used. It`s very useful for swapping between different versions, because once a project is made with one version, it may not be compatible with others (This itself is an annoying weakness of Node, but i`m willing to live with it). As for now, we can use it to install Node.
NPM (Node Package Manager)
This is also a tool for Node and is used for installing packages and dependencies needed for your application. NPM is automatically installed when installing Node.
Node.js
Okay but what is Node? Honestly im not sure how to explain this, something about running javascript code or so. What I do know is that it's insanely useful for APIs, UI, and library management, among other things. If you don't know what that means, don't worry it's not important for now. You can try to make sense of ChatGPTs response if you want:"Node.js is an open-source, cross-platform JavaScript runtime environment that allows you to run JavaScript code on the server-side. It uses a non-blocking, event-driven architecture, which makes it efficient and suitable for scalable, high-performance applications".
Mac/Linux
First check if you already have nvm:
If you dont, install with this command and make sure to restart your terminal after.
Now install Node. This can be done with NVM, but if it doesnt work you can do it from the website.
NOTE: Choose v22 (latest), not LTS (Long Term Support, which is now v20). Version 22 will be LTS later this year, so getting the newest version now is beneficial.This command will install the newest version. You can also install any version you want and swap between them with nvm install XX.XX.X and nvm use XX.XX.X.
Now check if they installed successfully:
Windows
First check if you already have nvm:
If you dont, download the installer from the NVM for Windows Github Page. Choose the nvm-setup.exe file.
Now install Node. This can be done with NVM, but if it doesnt work you can do it from the website.
NOTE: Choose v22 (latest), not LTS (Long Term Support, which is now v20). Version 22 will be LTS later this year, so getting the newest version now is beneficial.This command will install the newest version. You can also install any version you want and swap between them with nvm install XX.XX.X and nvm use XX.XX.X.
Now check if they installed successfully:
Nooooow, its time..
Create a next.js app
Open a terminal and navigate into your cloned repository (should be a folder named "username".github.io).
Use the npx command to create a new Next.js project in the current directory.npx is a tool that comes with npm and allows you to run commands from packages without globally installing them.
You will then be prompted to choose some configurations for you new app. If you know what you're doing, choose to your liking. If not, I recommend these options:

I wont go into detail about what these configs are, but here is a short overview:
- Typescript: This is essentially Javascript, or at least it builds on it. Unlike Javascript, Typescript lets you define types for variables, function parameters, and return values. This will help you catch errors at compile-time rather than runtime, which is very useful for debugging.
- ESLint: This is a tool for consistent formatting of code throughout your application. Especially nice to have on group projects.
- Tailwind CSS: CSS is for styling your web app. Tailwind CSS is a utility-focused framework for CSS that comes with pre-defined classes that you can use directly on HTML objects to style them. CSS can also do this, but Tailwind does it smoother and more compact (though I will argue way less readable as well). As we plan to use a component library for this project, you won't really have need of Tailwind, but nice to have in case.
- /src: If you say yes to this, all the main application files of the website will be placed here. It's just an extra layer in your file system, and it separates your source code from your config files, gitignored stuff, and other extra resources. I like to have this option enabled.
- App Router: This setting uses the newest next.js routing features, for referencing files throughout your filesystem. For example, in a normal React project you would put all the pages that you want to render inside a /pages folder, but with this system you can put your rendered pages anywhere as long as you call the file page.tsx. You can then reference that page with the folder it is placed in. Here is an example:
- Import alias:An alias defines how you can reference other files, for exmaple when you want to import something from them. By default if you want to acces other files from a nested component, you would have to reference backwards like this "../../..", but with custom alias you can avoid this by setting up some rules. This is actually super useful, but I have chosen to not include it now because we need to focus on the important stuff first. Also, this can easily be configured after the project is made!
Finishing touches
Your now have a next.js project! The first thing you should do is to open the project in your code editor. Then make an initial commit to your repository. This is done by adding all files to the staging area, committing them, and pushing them.
Now you have to install the dependencies of the project. Make sure you are in the root of the project and run this command:
This will install all the libraries and packages that the project needs to run locally on your pc, into a folder called node_modules.
You should now be able to see your project at you github pages url. It may only display the readme page, but we will fix that later.
Using the deployed website under development is impractical, as it takes a while to update. Instead, we want to start a development server with hot refresh so we can see all our changes in real time.
To start the development server, run this command, and then navigate to localhost:3000 in your browser.
The file structure
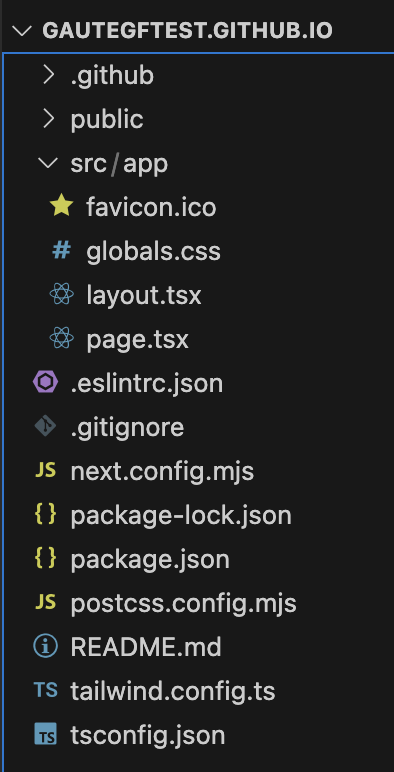
For now lets focus on the files you need to know about:
- /src: This is where you place your main application files. Inside it you will find the app folder, which contains the layout and pages of your website. Inside /src you can put your components, styles, and other folders/files that you want to use in your project.
- /app: This is where you place your rendered pages. If you want to render a page at /about, you should place it in a folder named "about" and name the file page.tsx. This is the new routing system I talked about earlier. NOTE: the file MUST be named page.tsx to be rendered.
- /app/page.tsx: This is the landing page of your website. You can edit this file to change the content of the page.
- /app/layout.tsx: This is the layout of your website. The code in this file will be rendered on every page of your website. This is where you want to put a navbar, footer, or other elements that should be on every page. You can also make more layout file for folders deeper into your project. The layouts will then be nested, so you can have a layout for the whole website, and a layout for a specific section of the website.
- /public: This is where you store static files, like images, that you want to use in your project. They will not be optimized when you build the project, so an alternative is to create an "assets" folder in the /src folder.
These are the most important files for now. You can read more about the file structure by googling.
Now that you have a project set up, you can start developing your portfolio. The first thing you should do is to create a navbar. This is the bar at the top of the page that contains links to other pages of the website. You can use the component library Material UI to import a prebuilt navbar, and customize it to your liking. You can also create your own navbar from scratch, but this is more time consuming.
Adding a navbar
I like to create a "components" folder in the /src folder, and place all my components in there. This keeps the project clean and organized. I then make a "navbar.tsx" file in the components folder, and add the code for the navbar.
I googled "Material UI navbar", found a component named Basic App Bar, and copied the code into my navbar.tsx file. I then customized it to my liking.
To render your navbar on every page, you need to import it into the layout.tsx file (line 4). You can then add it to the layout component like this (line 21):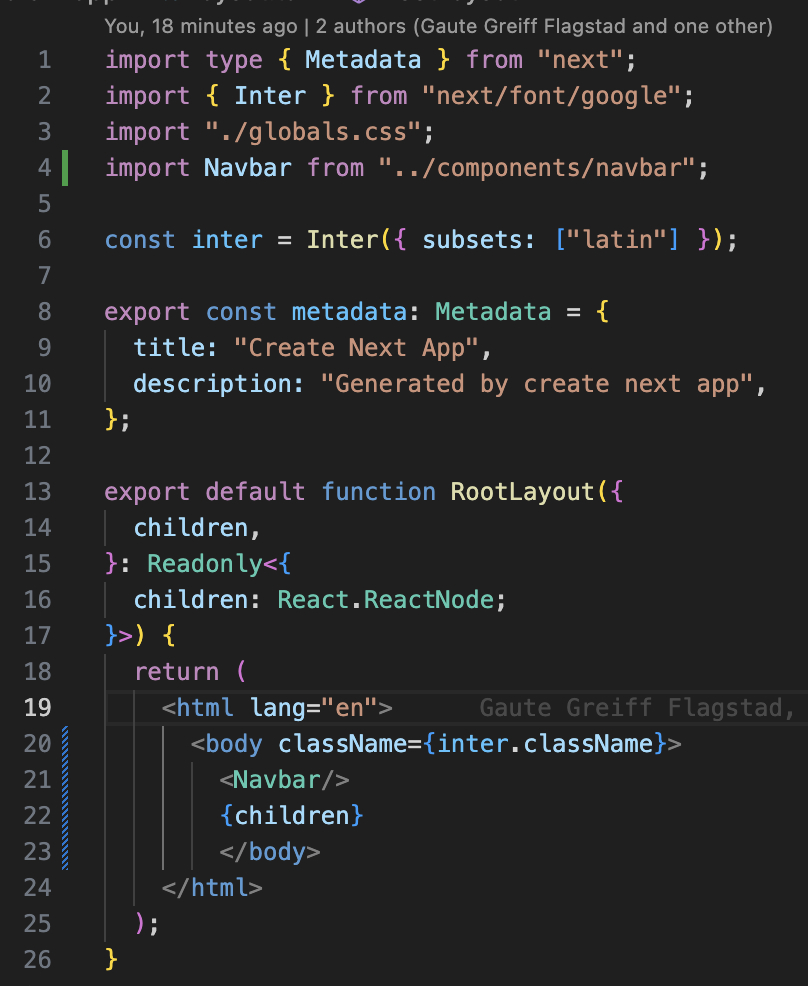
With this method you can add multipe components to you website and build it up step by step. Try adding a footer and a couple other pages your can link to.
Automatic deployment
Navigate into your repository, and click "Settings".
In the "Code and automation" section of the sidebar, click "Pages"
Under "Build and deployment", select "Github Actions", and then select "Configure"
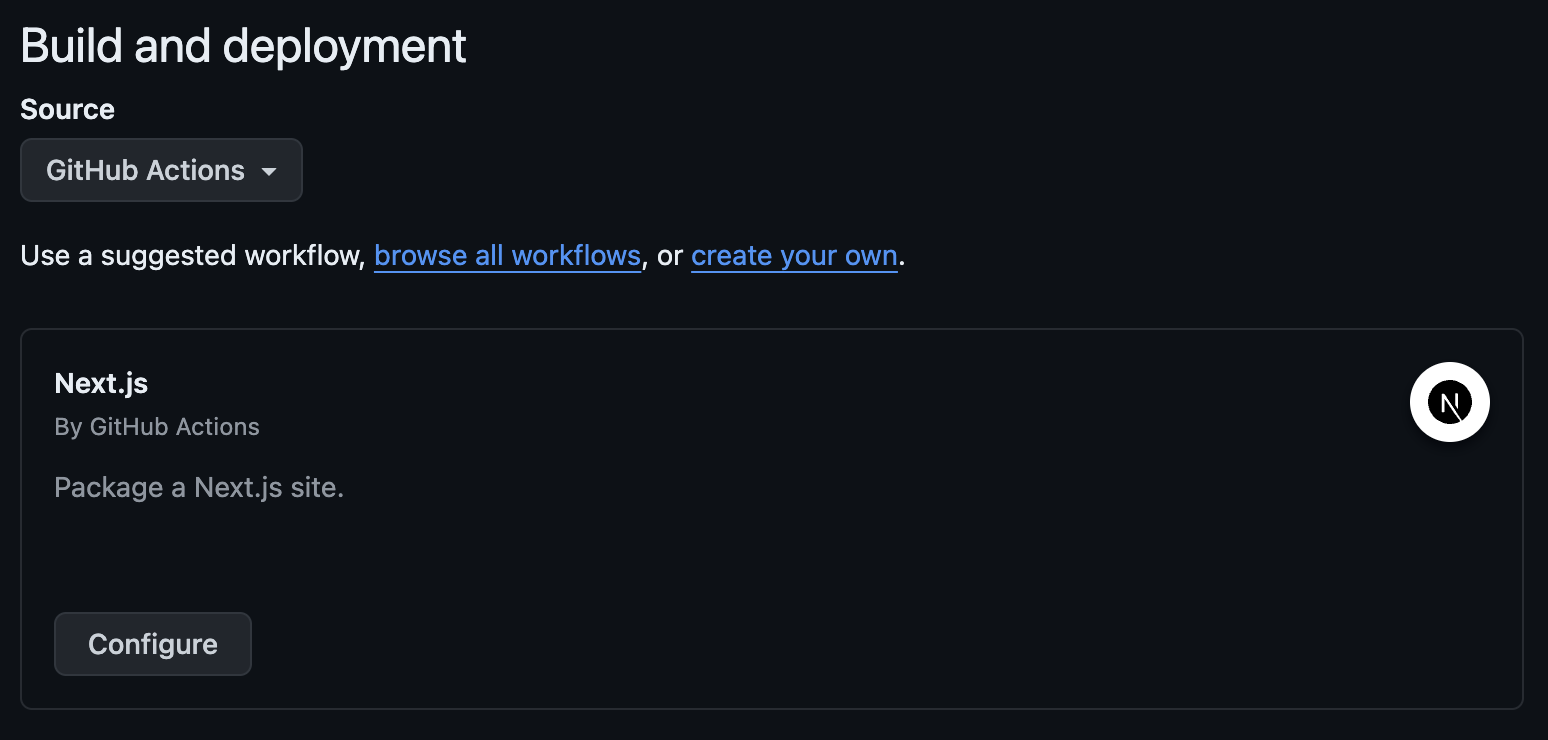
You are now about to create a yml file that will automatically deploy your project to Github Pages. Press the green "Commit changes" button in the top right corner, and when a window pops up, press "Commit changes" again.
Now you need to pull this change to your local repository. From now on, when you push changes to the repository, the updated project will automatically be deployed to Github Pages.
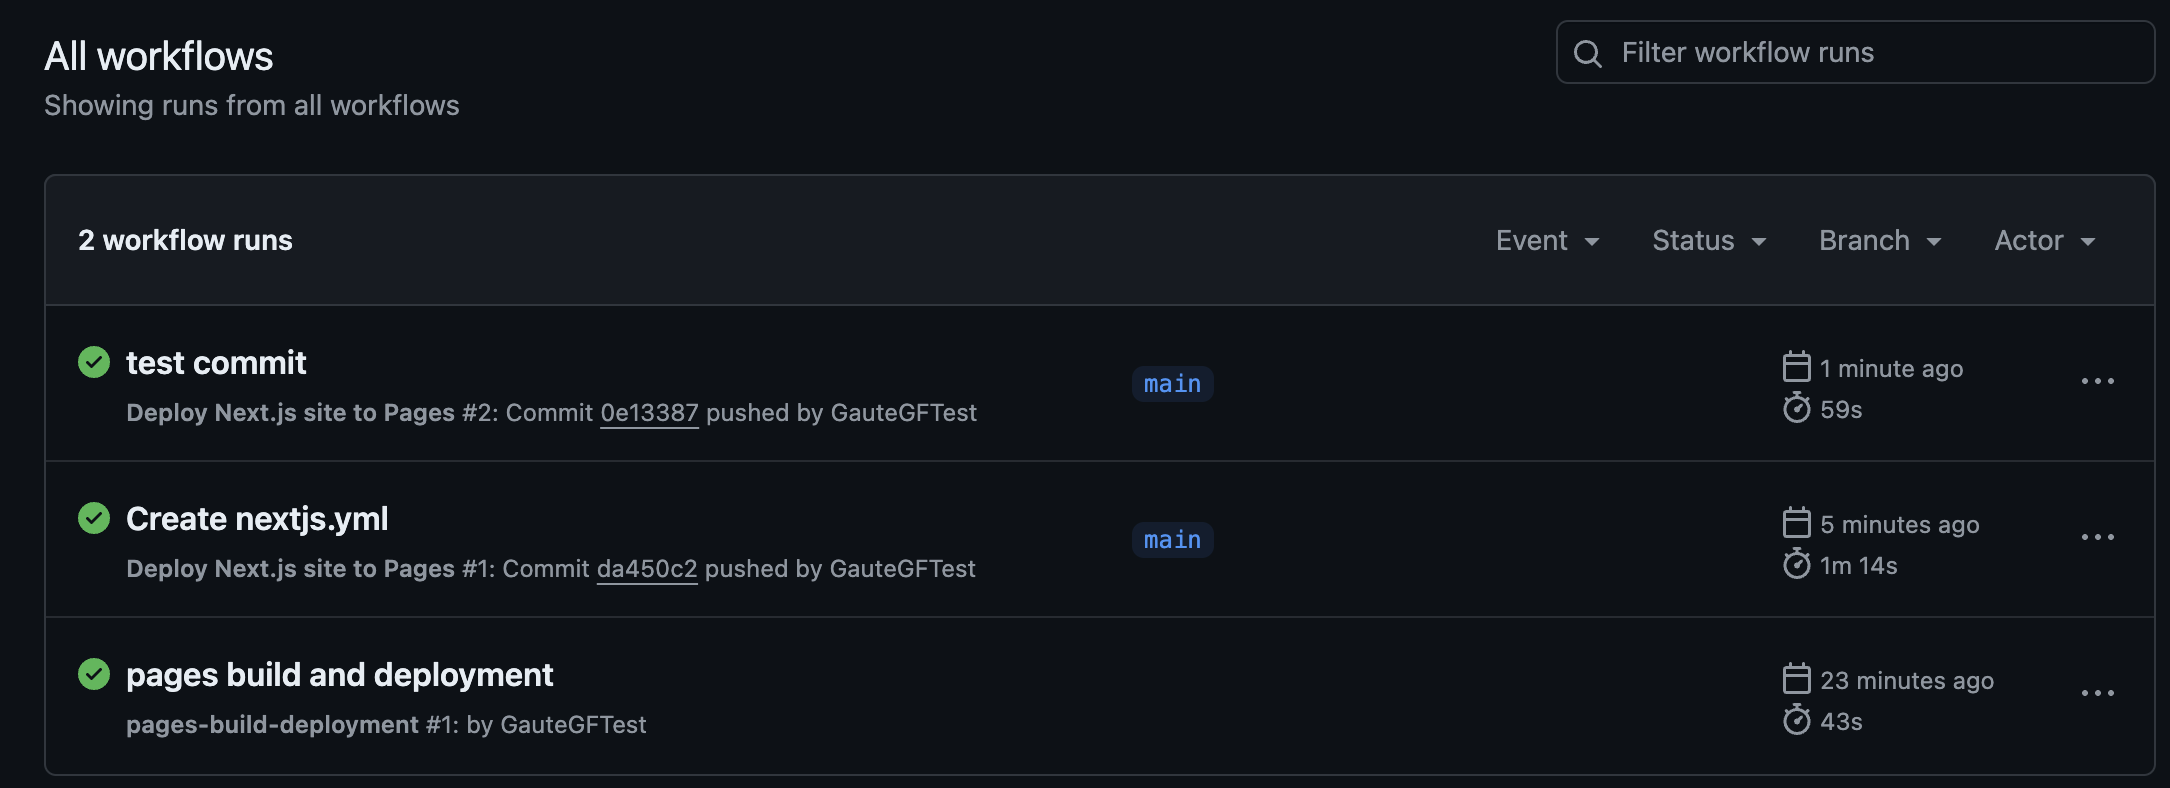
Test this by making a small change to page.tsx, commiting it, and pushing it to the repository.
Go into the actions tab on guthub and see if the deployment is successful. It should look something like this: